Photoshop Dragon
 

Adobe Photoshop Tutorials, Tips and Tricks

Home

Digital Photography

Text Effects

Artistic Techniques

Textures

Special Effects

Free Brushes


Bestselling CDs at $9.99 Everyday!
 

Basic Coloring Techniques

Photoshop is a wonderful tool for coloring line art. In this tutorial for beginners, we'll learn the basic techniques along with some useful tips to do just that. We'll start with the line art on the left and we'll end up with the result on the right:

This creature is a dragon and was drawn by an artist friend of mine who goes by the name of Crazydragon. You can visit her web site to see more of her work here. I would like to thank her for letting us use her artwork in this tutorial.

The coloring that we'll do here is just the first step. In later tutorials, we'll add more color and detail and even add a background to this image to more fully bring it to life. Ready to begin?

Keywords:

coloring line art, coloring scanned drawings

Features Used:

magic wand, Multiply blending mode, paint bucket, layers

Corel.com

Easy Updates 120x90


1

You may download a copy of the line art so you can follow along with this tutorial by clicking here. If you're a Mac user, just drag the image to your desktop (or where ever you want to put it). If you're on Windows, right-click on the image and select "Save Image As..." and specify a location. Once you get it saved on your computer, open it in Photoshop.

As is sometimes the case with black and white line art, this image was saved in grayscale mode. Since we'll be adding color to it, we first need to convert it to RGB. So select Image->Mode->RGB Color now.

Also, when opening image files like this, Photoshop generally puts it into a locked layer called "Background" as shown to the right. We don't want a locked layer since we will want to change it's position in the layer stack, so we need to unlock it. To do that, double-click the lock icon, and in the dialog that comes up, enter a layer name of "Line Art" to help us keep track of things, then click OK.

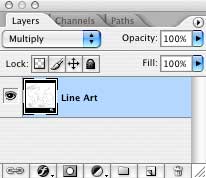
Photoshop Tip: When coloring line art in Photoshop, the easiest way to do it is to apply the color on layers underneath the line art and use the Multiply blending mode for the layer with the line art itself. The multiply blending mode causes all the blank white areas to behave as if they were transparent while leaving the black alone. This allows the color on the layers below to show through while retaining the black lines. The advantage here is that this saves us the trouble of erasing the white.

So with that in mind, change the blending mode for the layer to Multiply. Your layers palette should be as shown to the right at this point.

2

I plan to use some dark colors on this dragon and the line art is a little on the gray side. So to prevent the lines from disappearing against the dark colors, I'd like to darken up the lines. It turns out this is really easy to do when the lines are a little gray like they are here. To fix this, just duplicate the layer. You can do this by either right-clicking on the layer and choosing Duplicate Layer, or you can drag the layer down to the new layer icon
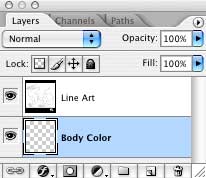
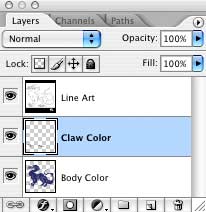
 at the bottom of the layers palette. As soon as you do, you'll notice the lines all get darker. This is because the layer is set to the Multiply blending mode and when you multiply gray with gray, the result is a darker shade. If the lines are really light, you can do this a number of times to get the darkness you want. With this image, I only had to duplicate it once to get the nice bold lines I wanted. Once you're happy with what you have, select Layer->Merge Visible to collapse all the layers together. An alternate way to accomplish this is to use a Levels adjustment on the layer, however I find that simply duplicating the layer is quicker and easier. Here's what my line art looks like now:

line art coloring step 2

3

Now let's get ready to add some color to the body. The artist who drew this tells me this dragon is evil, so I've decided to give him a dark bluish base color along with red eyes and claws. That should look a little menacing. To color this dragon, we're going to let Photoshop do most of the work for us. We'll use the Magic Wand and the Paint Bucket tool as follows:

First, choose the Magic Wand and set the tolerance to around 40 and check both "Anti-alias" and "Contiguous". The Contiguous option is an important one since it keeps the magic wand from selecting pixels outside the lines of the artwork. I have the tolerance set to 40 for a reason. If you zoom in closely and examine the lines, you'll find that the lines are roughly 2 to 3 pixels wide and feathered a bit so the edges of the lines have gray edges. This makes the lines look nice and smooth, but we need to make sure some of the color we'll be adding will go under these gray pixels. If we don't do this, then some of the interior edges may be visible after we add the color. So setting the tolerance a little higher essentially expands the selection all the way to black point of the lines. This is a handy way to let Photoshop work for us. Note that for the Contiguous setting to work properly, the lines on the artwork need to be completely closed. Otherwise the selection the wand makes will spill out into the empty outside the drawing. Fortunately, all the lines in this drawing are closed, so we won't have a problem. Here are the options you should have selected in the tool bar:

Now take the wand and check somewhere inside the neck region of the dragon for starters. This will give you a nice selection that will include almost all of dragon's body. The only thing missing from the selection is the dragon's eye, claws, fangs and the two legs on the opposite side. We're going to color eye, fangs and claws separately, so don't worry about them for now. However, we do want to add the two other legs to the selection. So hold down the Shift key and click on the missing parts to add them to the current selection. You will have to click on a number of small areas, particularly around the toes to get all the portions that are part of the body (but don't select the claws themselves).

Photoshop Tip: When making selections is tight areas, use the Zoom Tool to zoom in close so you clearly see the areas that need to be selected and can then use the wand to precisely select those areas.


4

As we talked about above, we'll add the color on a layer underneath the line art, so add a new layer by clicking on the New Layer button on the bottom of the layers palette (or choose Layer->New Layer from the menu). So we can keep track of our layers, double click on the layer name and change the name to "Body Color". Note that Photoshop always creates new layers above the currently selected layer, however we want this layer underneath our line art. So grab the new layer with the mouse and drag down below the line art layer. When you're done, your layers palette should look like the one at the right.


5

Time to add the color. Select the Paint Bucket tool and set the foreground color to the color of your choice. I'm using a dark blue color on mine which is color #2b2b74. This color may seem a little dark, but it's just the base color. In later tutorials, we'll be adding highlights and some brighter colors to bring the image to life.

Once you have your foreground set, make sure the Body Color layer is still selected and click inside the body to paint the selection we made in Step 3 (which should still be active). Now deselect the selection so you can clearly see the result (hit cmd-D on the Mac or cntl-D on Windows). You will probably notice some small areas of white that should have been painted but weren't part of the selection you made. If there are large areas missing, take the magic wand again to select those areas. You will first need to select the layer with the line art so the wand knows which areas it should be looking at. Once you have the areas selected with the wand, click on the Body Color layer and then fill them with the paint bucket.

If instead you notice some small little dots of white around some of the edges, then the easiest way to fix these is with the Paint Brush . Choose a small diameter and 100% opacity. Use the Zoom Tool to go in tight so you can clearly see the dots and where to apply the paint. Just click the brush on top of the dots to fill them in. I had to fix about a dozen little dots in mine, but the final result of this step looks pretty good. As you can see, it's much easier to use the magic wand and paint bucket to do the bulk of the work instead of trying to color the entire image with just the paint brush.

line coloring step 4

6

We'll color the claws next by repeating steps 3, 4 and 5. Before using the magic wand to select the claws, remember to first click on the line art layer again. The magic wand only looks at the pixels in the currently selected layer when deciding what to include in the selection. So we'll always need to return to the line art layer to make our selections. You'll also need to zoom in to make the selection on the claws since some of the areas are pretty narrow. Just go through each claw and select it with the wand while holding down the shift key so that each click adds that area to the selection.

Photoshop Tip: Keep each color on its own layer. This makes it easier to go back and make changes if needed later. For example, you may later decide a color you picked isn't quite right. If each color is on its own layer, you can quickly adjust just that layer using say the Hue/Saturation adjustment or maybe a Levels adjustment, all without affecting the colors in other layers. So create a new layer before applying the color to the claws.

I colored the claws dark red with color #73161f on mine. Your layers should like those to the right at this point. Below is how the artwork should look now.

coloring line art step 5


Great Big Canvas

 
Barnes & Noble Deal of the Day


7

Let's color the fangs next. I picked a light yellowish color (#e9e3c5) for mine. As always, create a new layer for the color. Here's what mine looks like:

dragon coloring step 6

8

Now we'll finish it up with the eye. We'll make the outer area around the eye a darker shade of blue to help make the eye stand out more. I used color #251a36. I then used a nice intense red (#ff0b09) for the eye itself. I decided a yellow pupil would be more intense than a traditional black one. For the pupil, I simply hand painted it on a separate layer with the paint brush tool set to 2 pixels in diameter with color #fee411. Draw the pupil towards the left edge of the eye so it looks like he's looking forward. Here's the final result:

dragon line art coloring step 8

So those are the basic techniques for coloring line art in Photoshop. Use the wand to select the areas to color on the line art, then create a new layer for each different color you plan to use and fill in the color with the paint bucket. Hopefully, you found these tips to be useful. In the next tutorial, we'll see how to add a pattern on top of our base color to make the image more interesting. Please check back for that tutorial. It will be posted here as soon as it's ready. This tutorial series will then continue further, with tutorials for adding highlights and shadows, as well as for making a simple background. Also, if you like dragons be sure to visit www.dragon-city.org. Among other things, there is a wide selection of line art templates you can practice coloring located in the fan art gallery area.


Thanks for visiting with the Photoshop Dragon.

More Tutorials

Home

Digital Photography

Text Effects

Artistic Techniques

Textures

Special Effects

Free Brushes

Great Big Canvas


Enjoy this tutorial?

If so, please consider making a donation. This site is run as a hobby and your donation will help defray the costs and allow more tutorials to be added.

You can also support this site by trying a free Netflix trial. Just click the link to the right. You get a free trial and this site receives a donation from Netflix.

Planning to buy something from amazon.com or Barnes & Noble? Before you begin your purchase, click one of the links to the right first, then place the items you want in your shopping cart. You pay the same prices you would anyway and this site receives a donation from these retailers. It's easy!


Copyright © 2007-2010 Curt Schimmel. The contents of this web site may not be copied in any way without permission. Terms of Use and Privacy Policy.