Adobe Photoshop Tutorials, Tips and Tricks
|
||||||||||||
Shadow RecoveryThis tutorial will teach you a quick and easy technique to lighten the areas of a digital photo that are too dark or underexposed. This acts as a sort of digital fill flash. Photoshop's own Highlight and Shadow Recovery tool is quite effective in many cases, however there are times when you want and/or need greater control to get exactly the look you want.
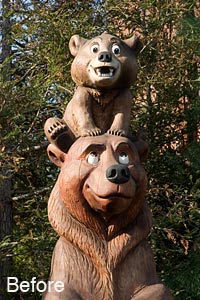
The picture on the left is a shot of a wood carved statue I took at Disneyland. It's a nice shot, and the sunlight coming from an angle makes a nice contrast, however I think it would look better if the faces of the bears weren't so dark on the right side. Now if I had an external flash unit that I could have held off the right side as I took the picture, it might have filled the shadows in nicely. But that's too much gear to carry and too much work. Fortunately, Photoshop makes it possible to add fill flash after the fact.
|
| |||||||||||
1
2
|
||||||||||||
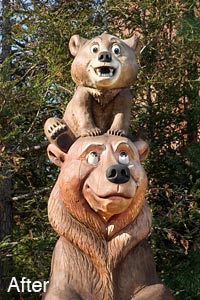
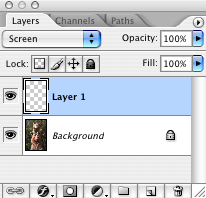
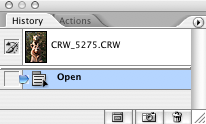
3Now select the history brush 4Make sure layer 1 is still selected, and now you can start painting away the shadows by just stroking the brush over the areas you want to lighten. Since the opacity of the brush is set to 40%, you can lighten things further by simply stroking the same area multiple times. If you need to make subtler adjustments, just reduce the opacity setting, or increase the setting if you need to make larger adjustments. What's happening is that Photoshop is copying pixels from the history snapshot to where you're stroking the brush in the new layer. Since the layer is set to Screen mode, this causes it to lighten those areas of the photo. As you can see, this is a very quick and easy technique. There's no need to create complex selections and then do a levels or some other adjustment. You just paint away the shadows. It took me less than a minute to adjust the photo you see above on the right. |
|
|||||||||||
|
|
||||||||||||
5If you're trying to lighten a really dark area, you'll find that the brush ceases to have an effect after awhile. This is because the history brush has copied the full pixel opacity into the layer and so it can't do any more. You can still make things lighter by just creating a second layer, set its blending mode to Screen and continue painting there. Once you have something you like, just Merge Down the layers. |
||||||||||||
Thanks for visiting with the Photoshop Dragon.
Copyright © 2007-2010 Curt Schimmel. The contents of this web site may not be copied in any way without permission. Terms of Use and Privacy Policy. |