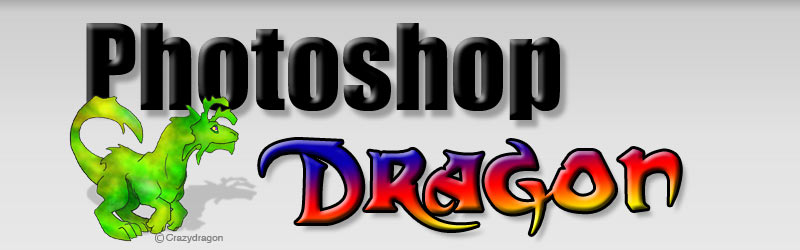
Adobe Photoshop Tutorials, Tips and Tricks
|
||||||||||||
The Plastic Look for Text and ObjectsSimulating different materials is an important capability in Photoshop. The key to making it work is based on two main things: surface texture and lighting. Doing both of these correctly creates a good illusion of a given material. In this tutorial, we'll look at creating the look of plastic, a shiny semi-translucent material. This effect works on both text and any other type of object in the layer. This is what our final product will look like:
We'll do the entire effect using a Layer Style. If you're using a really old version of Photoshop that doesn't have layer styles, I urge you to upgrade. Layer styles (along with all the many other new features) is a real time saver.
|
| |||||||||||
1I started out with an empty canvas 900 pixels by 500 pixels. It's easier to see how the effect works when looking at it on a white background, so set your foreground color to white and press alt-delete to fill the layer with the foreground color (white). Next we'll get some text to work on. I used a font called Serpentine-Bold because I wanted some blocky looking letters. I set the point size to 200. For this example, I'm going to make blue plastic so I set the text color to #08b6ff which is a nice light blue. We'll be adding a darker blue on top of this later. The two shades will work together to help achieve the translucent look. You can work with any color you want. For now, pick a light shade of whatever color you desire. Type some text and center it. I just typed the word "Plastic". To quickly center it in the layer, hit cmd-A to select all (cntl-A for Windows), then hit "v" to select the Move Tool
2Now we'll build up the effect to achieve the plastic look with a series of layer styles. Open the layer styles dialog with Layer->Layer Style->Satin and we'll begin there. We'll use this setting to replace most of the light blue with a darker blue. A little of the light blue will be left showing around the edges which will help make the translucent look. If you're using a color other the blue I'm using, you'll want to pick a darker shade of that color and set that for the blend color of the effect. I used #2020f2. Here are the settings I used:
As always with the settings in layer styles, the values for things like distance and size will need to be changed if the size of the text you're working with is larger or smaller. For smaller text, the distance and size settings will need to be reduced to fit correctly with the smaller size of the letters. Similarly, if the font is larger, you'll need to increase these values to keep the size of the effect proportional with the size of the text or objects. Here's what mine looks like using the above settings:
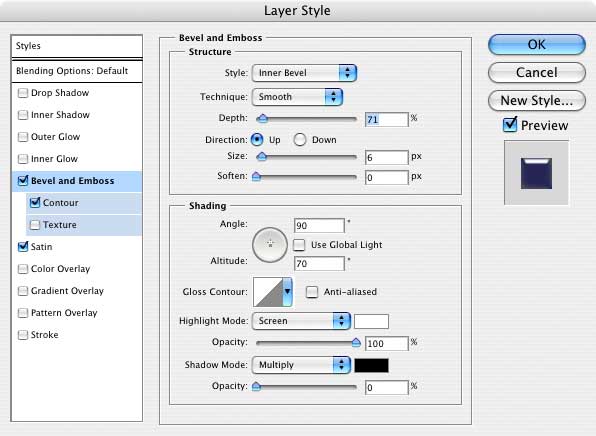
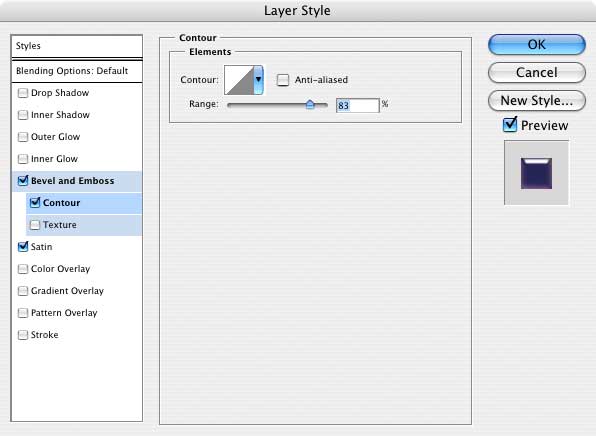
3The next step is to give it a three dimension look with beveled edges. This also adds the surface shine that one expects to see on plastic. Use these settings:
We'll also use a Contour setting to add some extra depth to the letters as shown below.
|
||||||||||||
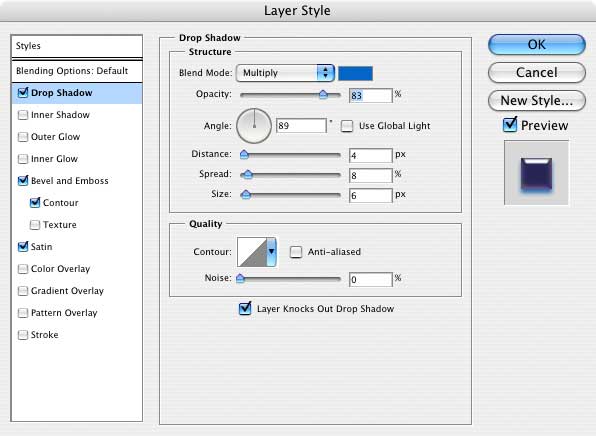
4Next up is to add a drop shadow. Since plastic is translucent, we'll want the drop shadow to be the color of the plastic instead of the traditional black. Since it's a shadow, you'll want to pick a darker, subdued shade of whatever color you're working with. I used #0465c9. Here are the settings for the drop shadow:
As before, you may need to adjust the distance, spread and size up or down if the text size or object you're working on is larger or smaller than what I'm using for this example. Things are starting to looking pretty good now:
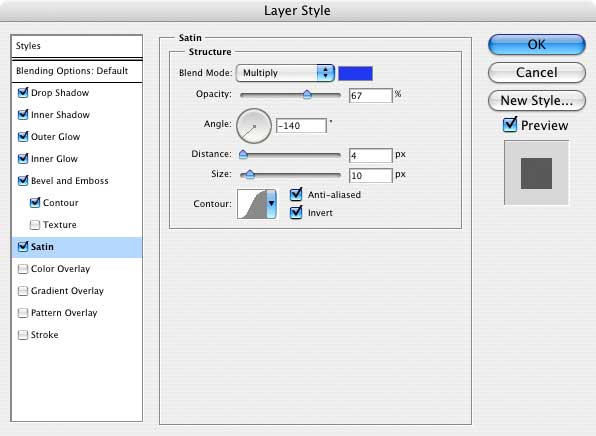
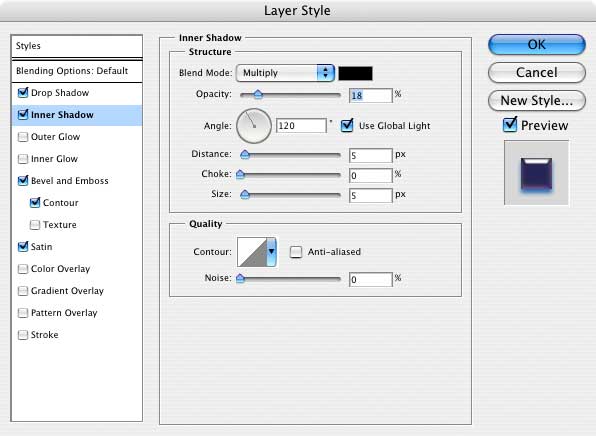
5Up next is to add an inner shadow. This effect is subtle and difficult to see here in these reduced size images, but it darkens the edges a little which adds just a touch more depth to the letters. The blend color here is black.
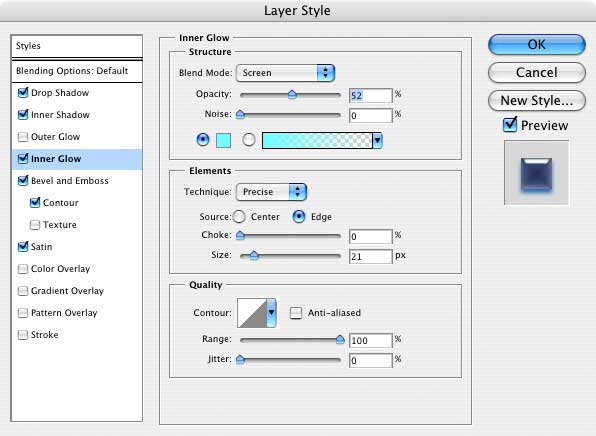
6Now we'll add an inner glow to create a pronounced illusion of translucency in the plastic. If you want the plastic text to be more opaque looking, then you can skip this step. For the color, you'll want something that's a very light, almost neon shade of the color you're working with. I used #70fdff for mine.
Now you can really see the light passing through the material:
|
|
|||||||||||
|
|
||||||||||||
7Finally, I'll demonstrate that the layer style works just as well for other kinds of objects and not just for text. First, create a new layer above the layer containing the text. Now select the Rounded Rectangle tool
8Just for fun, we'll also add a shape with the Custom Shape Tool
9Now go the Layers Palette and right click on the layer with the text and select "Copy Layer Style" from the context menu. Then right click on the layer we created in Step 7 and select "Paste Layer Style" to apply the same settings to these new graphics. Here's what we get:
As you can see, the effect works just as well with any type of filled area. We'll add a simple gradient to the background and we're done!
|
||||||||||||
Thanks for visiting with the Photoshop Dragon.
Copyright © 2007-2010 Curt Schimmel. The contents of this web site may not be copied in any way without permission. Terms of Use and Privacy Policy. |