Photoshop Dragon
 

Adobe Photoshop Tutorials, Tips and Tricks

Home

Digital Photography

Text Effects

Artistic Techniques

Textures

Special Effects

Free Brushes


Bestselling CDs at $9.99 Everyday!
 

Text on Fire with Glossy Reflection

Burning text is a great looking special effect and it can be achieved with relative ease in Photoshop. Even a glossy looking surface reflection is easy to pull off. This tutorial shows how to make flaming text, but the technique will work with any kind of object. Here's what the finished product looks like from this tutorial:

burning text final image


Keywords:

text on fire, flaming text, burning text, glossy surface reflection, special effects

Features Used:

text tool, wind filter, gaussian blur, liquify tool, hue/saturation adjustment, layers, Overlay blending mode, gradient tool, lock transparency, layer styles, drop shadow, inner shadow

Corel.com

Easy Updates 120x90


1

Let's get started by creating a new document and filling it with black. I made mine 800 by 800 pixels, but you can pick any size depending on how much text you need to fit in.

2

Time to put down the text we want to see burning. I just used the word "FIRE" for this example. I used the Arial Black font at 250 points since I thought the block letters would look more intense. Put the text in white. After you've typed in what you want, choose Layer->Rasterize->Type to turn the text into pixels. Then use the Move tool to reposition the text so that it's centered horizontally and is just a little below the center line vertically. Here's what it should look like at this point:

text on fire tutorial step 2


3

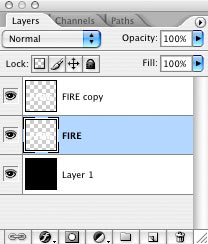
Duplicate the layer with the text on it. We're going to use the duplicate to create the foreground text effect and the original text layer to create the rising flames illusion. Your layers should look like those to the right. We're going to work on the middle layer next, so make sure it's selected and highlighted as shown here.

4

To get the flames rising, we're going to use the Wind filter. This filter only works going to the left or right, so we have to rotate our canvas first. Choose Image->Rotate Canvas->90 CW. Make sure the middle layer is still selected and choose Filter->Stylize->Wind. Select "Wind" and "From the Left" in the options and click OK. We need more wind than one application of the filter provides, so hit Cmd-F four times (or cntl-F if you're on Windows) to apply the filter four more times. You can use more or less applications depending on how high you want the flames to go. Finally, rotate the canvas back to normal with Image->Rotate Canvas-> 90 CCW. This is what it should look like now:

Flaming text tutorial step 4


Great Big Canvas

 
Barnes & Noble Deal of the Day


5

Now we need to make the wind streaks look more like flames by blurring them together. Select Filter->Blur->Gaussian Blur and set the radius to 3 (make sure you still have the middle layer selected). You can use more or less blur depending on how you want the flames to look. Here's what I got so far:

text on fire tutorial step 5

6

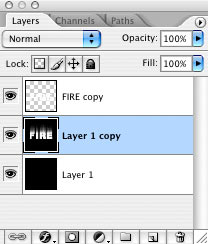
The next step is to give our flame layer a black background which will be needed for the next step. To do this, duplicate Layer 1 (our original background layer) and merge this duplicate layer with the blurred text layer we just made. This won't change the look of the image just yet, but your layers should now look like those to the right.

Continue to Page 2 ->


Thanks for visiting with the Photoshop Dragon.

More Tutorials

Home

Digital Photography

Text Effects

Artistic Techniques

Textures

Special Effects

Free Brushes

Great Big Canvas


Enjoy this tutorial?

If so, please consider making a donation. This site is run as a hobby and your donation will help defray the costs and allow more tutorials to be added.

You can also support this site by trying a free Netflix trial. Just click the link to the right. You get a free trial and this site receives a donation from Netflix.

Planning to buy something from amazon.com or Barnes & Noble? Before you begin your purchase, click one of the links to the right first, then place the items you want in your shopping cart. You pay the same prices you would anyway and this site receives a donation from these retailers. It's easy!


Copyright © 2007-2010 Curt Schimmel. The contents of this web site may not be copied in any way without permission. Terms of Use and Privacy Policy.