Adobe Photoshop Tutorials, Tips and Tricks
|
||||||||||||
Installing BrushesIn this quick tutorial, we'll learn how to install new custom brushes into Adobe Photoshop. Photoshop comes with only a basic set of brushes, but fortunately there are a wide variety of specialty brushes available. Click here to view a collection of some of the best free photoshop brushes available.
|
| |||||||||||
1When you find a brush set on the Internet you'd like to try out, click the appropriate link to download the file containing the brushes to your computer. For selection of some of the best free Photoshop Brushes, click here. Go to your browser's download folder and look for the .abr file that was just downloaded. The .abr file type is for Adobe Photoshop brushes and will typically be displayed with the brushes icon |
||||||||||||
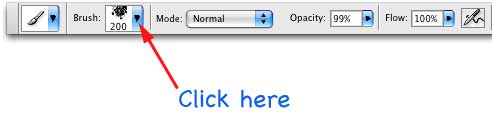
2Copy or move the .abr file to your Photoshop installation folder. If you're a Mac user, this folder will be Applications > Adobe Photoshop CS3 > Presets > Brushes. If you're a Windows user, it will typically be C:\Program Files\Adobe\Photoshop\Presets\Brushes. Note that these folder names may vary depending on which version of Photoshop you have and whether or not it was installed in the default location. Quit and restart Photoshop so that it will pick up the new brushes. 3Select the brush tool by pressing b or clicking on the brush icon in the tools palette
|
|
|||||||||||
|
|
||||||||||||
4In the picker, click the triangle on the right side to open the context menu. If you installed the .abr file in the correct folder, Photoshop will display the name of the brush set in the list as shown here:
5You now have the option of appending the new brush set to the scrolling list on the left of the preset picker or having the new set replace those in the list. Choose whichever option suits you needs. Appending is handy since you can have multiple sets of brushes available at once. However, if you load many brush sets the list can get quite long, so sometimes it's easier to replace the presets with just the ones you'll be using next. And at any time, you can use the "Reset Brushes..." option from the context menu shown above to get back to Photoshop's default set of brushes. Now just select the brush you want from the presets list on the left and start painting! |
||||||||||||
Thanks for visiting with the Photoshop Dragon.
Copyright © 2007-2010 Curt Schimmel. The contents of this web site may not be copied in any way without permission. Terms of Use and Privacy Policy. |