Adobe Photoshop Tutorials, Tips and Tricks
|
||||||||||||
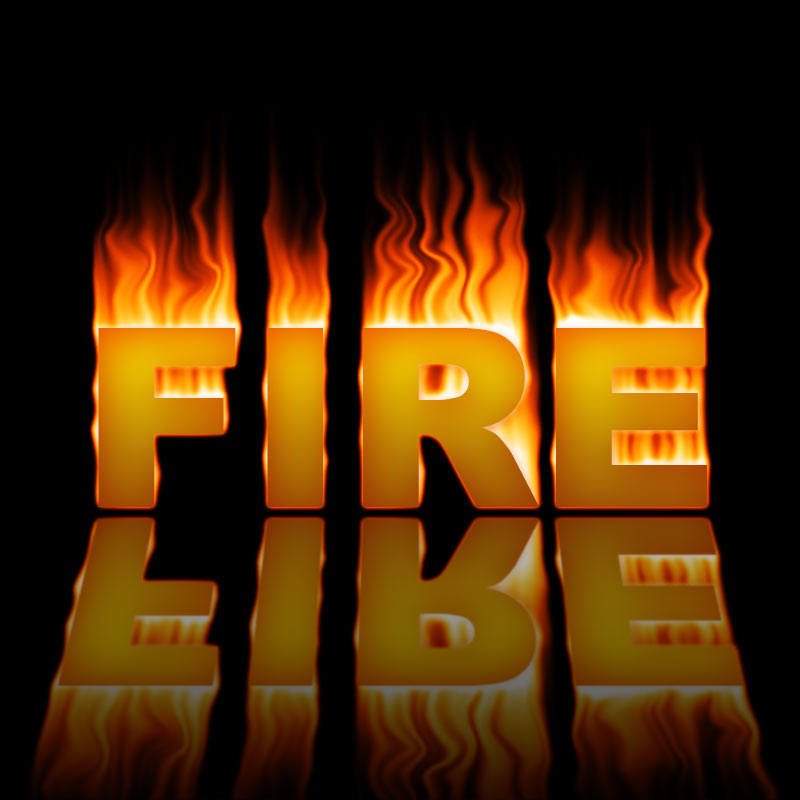
Create a Glossy Surface ReflectionReflections are a great way to add three dimensional depth to any type of object. Fortunately, it's an easy special effect to create in Photoshop. Here's an example of the finished product using the text on fire effect we created in that tutorial:
|
| |||||||||||
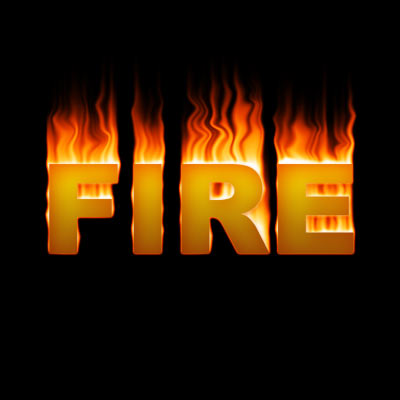
1For this tutorial we'll start off with the burning text effect we created in one of the other tutorials on this web site. Click here to view the text on fire tutorial if you haven't tried it yet. Below is our starting point for this tutorial. You can use any object you want of course and the background doesn't have to be black. The flaming text looks good on a black background, but this technique works for any color.
2To create the reflection, we'll make a duplicate of the layer we want to see in the reflection. So duplicate the layer. The reflection needs to be a mirror image, of course, so we'll flip it over. Make sure the top most layer is selected and choose Edit->Transform->Flip Vertical. Now set the blending mode for this layer to Screen. Among other things, screen mode makes the color black essentially disappear. This will allow the image on the bottom layer to show through where there's black on the top layer. Lastly, select the Move tool
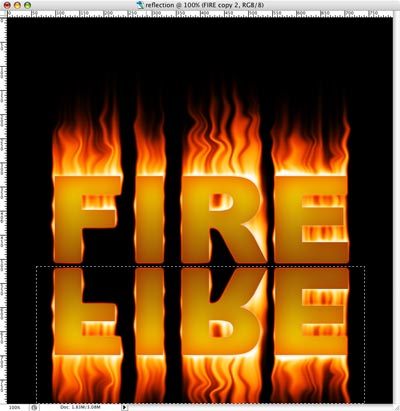
3So far so good. Reflections on a surface tend to spread out the farther away they get from the object being reflected. This creates the illusion of a surface. We can easily achieve this by distorting the reflection a little bit. To begin this, select the Rectangular Marquee Tool
|
||||||||||||
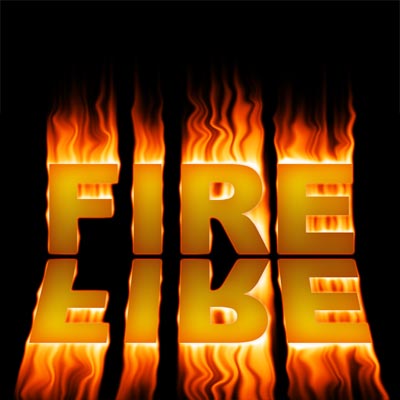
4At this point, it helps to reduce the magnification to 50% or less to give us a little elbow room to use the next tool. Select Edit->Transform->Distort, making sure the layer with the upside down text is still selected. Now grab the handle in the lower right hand corner and drag it a little ways further to the right. Next grab the handle in the lower left corner and move it horizontally to the left by the same amount that you moved the other one to the right. This will keep things even looking. Feel free to move the handles a little beyond the edge of the canvas to achieve the effect you want. This creates a nice illusion that there's a surface there. Hit return when you're happy with what you have to commit the change. Deselect the selection with cmd-D (or cntl-D for Windows). Here's the result:
5
|
|
|||||||||||
|
|
||||||||||||
6We will next apply a black and white gradient to cause the contents of the reflected text layer to fade out as it gets farther away from the original text. Click inside the white box of of the layer mask in the layers palette. When you do so, you'll notice that the foreground and background colors change to white and black. Layer masks are always grayscale images, so we work with these colors. Now select the Gradient Tool
7To fade the reflection, swipe out a gradient by moving in a downward direction on top of the image. Since the layer mask is currently selected, the gradient will be drawn in the mask as opposed to on top of the image itself. I started by clicking around the middle of the "R" and dragging down until I was a little ways beyond the edge of the canvas. If you don't like what you see the first time you try it, just do it again. Each time you swipe the gradient it will replace the previous one since we selected the Normal blending mode in the tool bar. What's happening here is that anywhere there's white in the layer mask, it allows the pixels in that layer to show through. Anywhere there's black in the layer mask, those pixels in the layer will become transparent. And anything in between black and white in the layer mask cause the corresponding pixels to become semi-transparent according to the gray level (the darker the gray, the more transparent they become). So our gradient from white on the top to black on the bottom causes a nice fade-out effect for the reflection. Here's the result:
8This last step is optional, but I find it helps. When an image is reflected on a surface, the surface usually scatters the light a little and makes the reflection a little blurry. So a slight blurring can add an extra element of realism. To add this effect, click inside the thumbnail in the layers palette for the reflected image. This will let us alter the pixels in the image itself as opposed to the contents of the layer mask. Once this is selected, choose Filter->Blur->Gaussian Blur. Set the radius to something that gives the look you want. I wanted the surface to be pretty glossy looking, so I used a small radius of just 0.7. You can use more or less depending on what you want. The blur effect is a bit subtle and difficult to see in these reduced size screen shots, but when you try this yourself you'll be able to see the effect more clearly. Here's our finished product:
|
||||||||||||
Thanks for visiting with the Photoshop Dragon.
Copyright © 2007-2010 Curt Schimmel. The contents of this web site may not be copied in any way without permission. Terms of Use and Privacy Policy. |